


Want to work with text and code more efficiently? Then leave the cradle of VS, Atom (or whatever you have), and dive headlong into the Vim editor.
Vim is a legendary text editor, capable of much, but unfriendly to beginners.
He really has to be conquered, but the reward for his work will be worthy. Throw your cozy modern editors, we go to Vim!
What is Vim?

In 1976, the father of Vim was born – the text editor vi. It was used to work in terminals and had very unusual methods of working in text editing mode.
Vim (Vi IMproved) is the last, most famous incarnation of Vi, its improved version, as the name implies. It is supported by any platform that you can recall and even has a graphical interface.
What kind of beast is Neovim?
You may have heard of Neovim. This is a modern fork of the classic Vim, refactored, easily extensible. Out of the box, he is no longer as harsh as his predecessor, it is quite possible to deal with him. Learn more about Neovim at neovim.io.
Why Vim?
You are definitely tormented by the question: why bother with such an ancient editor in 2018? Do not rush to draw conclusions.
The Vim path is completely unlike anything you’ve seen before. It raises you to a qualitatively new level of fluency, turns it into a surgeon who masterfully performs the most complex operations on code.
The Vim text editor is specifically designed for super performance. The location of each team is thought out to the smallest detail.
The main keys are right under your fingers! Each editor mode has its own set of combinations, you do not need to bend your fingers, trying to grab all the necessary buttons at once.
Another strength that makes Vim the best editor in the world is its adaptability. It can be perfectly customized “for yourself” (or for your team).
Vim is so good that most other editors today support some kind of Vim mode.
To summarize a quote from the magnificent book Practical Vim :
In the hands of an expert, Vim rips text at the speed of thought.
We taste Vim
When working with Vim, you will spend most of the time in normal mode, editing and optimizing already written text.
Place the fingers of your right hand on hjkl. Now, this is your main position. These keys move the cursor left-down-up-right, respectively. You can also navigate between whole words using:
w( w ord) – to the beginning of the next word;e( e nd) – towards the end of the next word;b– to the beginning of the word;ge– by the end of the previous word.
Using these keys, you can go to the desired location in the file and strike with high precision:
daw– the word has gone ( d elete a w ord);das– the whole sentence ( s entence) has been deleted;dap– paragraph deleted ( p aragraph)!
Instead of breaking, you can do an improvement:
caw,cas,cap– change a word, sentence or paragraph ( c hange);ctx– replace everything up to the first character x in the current line ( c hange t ill x );с$– all to the end of the line;- ci( – everything between the characters of the brackets;
- ci” – everything between double-quotes.
Take a simple line:
const msg = "Hello, vim"
and change her f'ci'Wat
const msg = "WAT"
In human language this means: find ( f ind) the next character ‘ , and then replace ( c hange) everything inside the characters ‘ with WAT . <ESC>exits insert mode to normal mode.

You can copy the line with the command yy(from the word y ank – vim-jargon for copying) and paste it below the command p( p ut).
The yank statement works exactly like d(delete) or c(change). It can be used to copy words – yawor sentences – yas. Dual Operators ( yy, cc, dd) act on the entire row.
Meaningless example
const msg = "WAT" const msg = "WAT"
Let’s execute the familiar command f'ci'MAN:
const msg = 'WAT' const msg = 'MAN'
Accelerate: kJcombine two lines into one ( k– rise, J– merge).
const msg = 'WAT' const msg = 'MAN'
And full delight: c3w+.
const msg = 'WAT' + 'MAN'

All this is completely pointless, but we still saw part of the Vim magic.
For longer moves, you can use counters in the format {number}{act}, for example:
5j– go down 5 lines;d2w– delete 2 words;c2s– change 2 sentences.
There are larger moves:
H– go to the top of the visible area in the editor;gg– go to the top of the file;LandG– the lower part of the visible area and the bottom of the page, respectively;{and}– moving forward / backward a whole paragraph;%– movement between pair brackets.
You can start a new line after the current ( o) or before the current ( O).
To search by template, a command is used /{pattern}, and n(next) and N(previous) allows you to move between the found fragments.
Repeat steps:
.(dot) repeats the changes;;– for actions started witht,f,T,F;n– to repeat the search.
You can even record command sets using macros.
So much power, and yet we practically did not go beyond the boundaries of the normal mode and did not even leave the training file!
And there are also splits, tabs, regular expressions, access to external tools, spell checking, word counting, 6 main modes and 6 additional ones with endless possibilities for customization and expansion.
Vim path
The basis of Vim is the keyboard. All important teams are located thoughtfully and as efficiently as possible:
- main movements in the central row under the right hand –
hjkl; - repeaters
;and.one below the other; - powerful command
fright under the left index finger; - immediately left the main operators:
s,x,d,c,r; s– it is a synonym forcl, andx– fordl;*and#are used to search for the current word back and forth. They are easy to launch with your middle fingers.
All operators are meaningful and easy to remember thanks to the mnemonic clues:
c– means change ( c hange),- change the letter ( c hange l etter) –
cl, - word ( c hange a w ord) –
caw, ciw– inner word ( c hange i nner w ord – without surrounding spaces),ct.– change everything to the nearest point ( c hange t ill . ).
You do not need to remember secret key combinations – all commands just make sense. In addition, they are very easy to combine, the composition is another sacred secret of Vim.
Why is Vim editor so harsh?
Let’s move on to the dark side of Vim, to the steep learning curve:
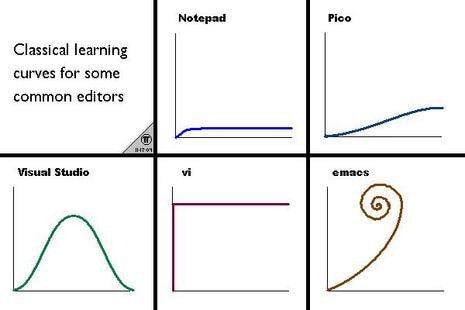
and unfriendliness:
Despite the fact that these problems are somewhat exaggerated, they still exist. There are at least 3 things that contribute to this:
- You need the ability to type blindly.
- Full control from the keyboard.
- A terrible first impression.
Blind typing
Without the ability to type blindly perform basic actions, you will be difficult and painfully slow.
Therefore, if you really want to conquer the Vim editor, start with touch typing. Here are some good resources:
Keyboard control
After working with a regular editor specializing in text insertion, the transition to Vim will be difficult.
Here you cannot use the mouse, explore the capabilities of the graphical interface or call the context menu, you cannot even type text or just exit the program. Everything here is too strange and too unfamiliar.
The best advice is to start with the basics and gradually expand your vocabulary:
- help –
:help {any team}or just:h {any team}; - moving –
hjkl(:h movementor:h motion); - go to insert text mode –
i(:h insert); - return to normal mode –
<ESC>(:h mode-switching); - save file –
:w(:h write); - exit the editor –
:q(:h quit); - open file –
:e {filepath}(:h edit).
Note the colon before most commands. It calls the command mode (ex mode).
The easiest way to learn the Vim editor is to combine it with your comfortable editor using vim mode.
So you do not fall into the position of Robinson Crusoe, retain all the features of a regular editor, and get the benefits of Vim.
The hardest thing is not to learn the commands, but to remember them at the level of instincts. It’s up to practice.
If you practice regularly, learning new combinations, you will quickly become a vim-master. Here are some useful resources to practice:
- vimtutor is a small built-in tutorial. Just type in the terminal
vimtutor(in neovim –:vimtutor). - “Bagels” – 2D text RPGs in which you move the character using the same keys
hjkland learn to better control the keyboard. - Vim Adventures is a fun vim game.
Bad first impression
The last bastion of Vim’s rigor is a terrible first impression . You type vim (or mvim for the Mac GUI, or gvim for Windows, the UNIX GUI) – welcome:
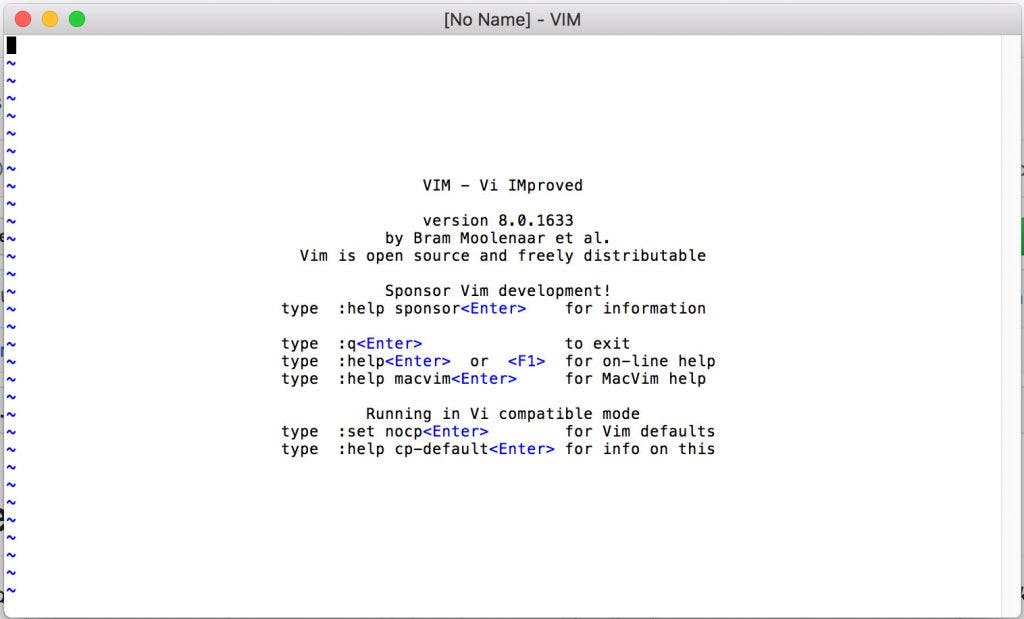
From this pale screen, you begin to work with the best editor in the world. Open the file – there is no syntax highlighting:
Very uncomfortable, at this moment, many run away in horror.
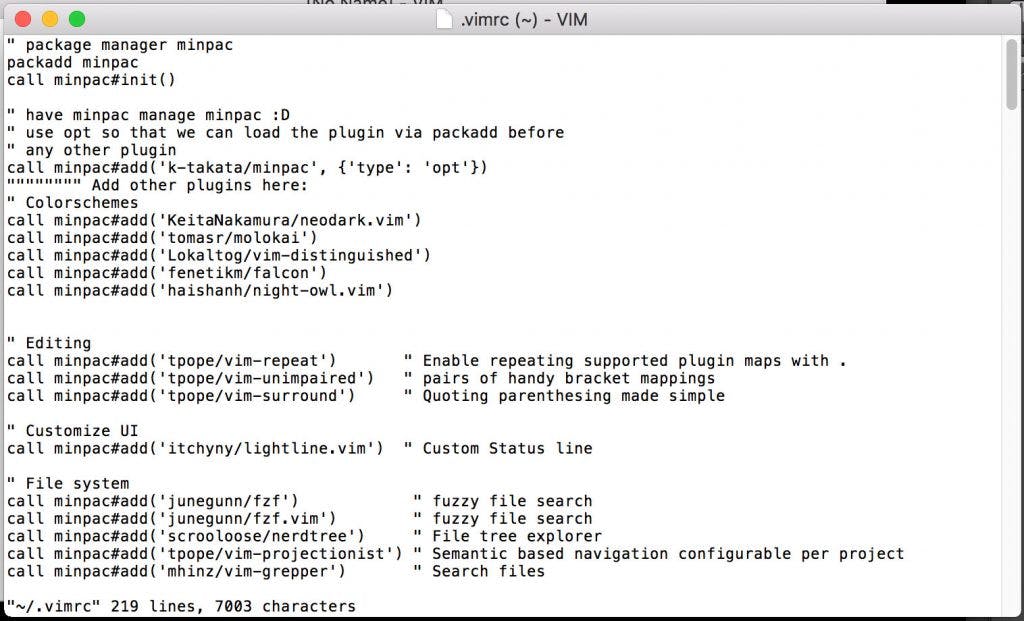
You may be tempted to use a pre-configured version of Vim. Of course, the first impression, in this case, will be better, but since you don’t understand how your instrument is tuned, miss the bottom line. It will be just a black box.
If you don’t feel able to conquer the Vim editor, try one of the following:
- Install neovim – it is easier and more enjoyable in many ways.
- Complete vimtutor.
- Play with the vim plugin in your usual editor.
- Customize the Vim editor for yourself – on vim-sensible or vim wiki you can find a convenient configuration.
- Connect the required plugins (with vim awesome ) using the extension manager (for example, vundle , vim-plug, pathogen or minpac ).
- Practice.
Vim Cheat Sheet
Global
- :help keyword – open help for keyword
- :saveas file – save file as
- :close – close current pane
- K – open man page for word under the cursor
Cursor movement
- h – move cursor left
- j – move cursor down
- k – move cursor up
- l – move cursor right
- H – move to top of screen
- M – move to middle of screen
- L – move to bottom of screen
- w – jump forwards to the start of a word
- W – jump forwards to the start of a word (words can contain punctuation)
- e – jump forwards to the end of a word
- E – jump forwards to the end of a word (words can contain punctuation)
- b – jump backwards to the start of a word
- B – jump backwards to the start of a word (words can contain punctuation)
- % – move to matching character (default supported pairs: ‘()’, ‘{}’, ‘[]’ – use
:h matchpairsin vim for more info) - 0 – jump to the start of the line
- ^ – jump to the first non-blank character of the line
- $ – jump to the end of the line
- g_ – jump to the last non-blank character of the line
- gg – go to the first line of the document
- G – go to the last line of the document
- 5G – go to line 5
- fx – jump to next occurrence of character x
- tx – jump to before next occurrence of character x
- Fx – jump to previous occurence of character x
- Tx – jump to after previous occurence of character x
- ; – repeat previous f, t, F or T movement
- , – repeat previous f, t, F or T movement, backwards
- } – jump to next paragraph (or function/block, when editing code)
- { – jump to previous paragraph (or function/block, when editing code)
- zz – center cursor on screen
- Ctrl + e – move screen down one line (without moving cursor)
- Ctrl + y – move screen up one line (without moving cursor)
- Ctrl + b – move back one full screen
- Ctrl + f – move forward one full screen
- Ctrl + d – move forward 1/2 a screen
- Ctrl + u – move back 1/2 a screen
Tip Prefix a cursor movement command with a number to repeat it. For example, 4j moves down 4 lines.
Insert mode – inserting/appending text
- i – insert before the cursor
- I – insert at the beginning of the line
- a – insert (append) after the cursor
- A – insert (append) at the end of the line
- o – append (open) a new line below the current line
- O – append (open) a new line above the current line
- ea – insert (append) at the end of the word
- Esc – exit insert mode
Editing
- r – replace a single character
- J – join line below to the current one with one space in between
- gJ – join line below to the current one without space in between
- gwip – reflow paragraph
- cc – change (replace) entire line
- C – change (replace) to the end of the line
- c$ – change (replace) to the end of the line
- ciw – change (replace) entire word
- cw – change (replace) to the end of the word
- s – delete the character and substitute text
- S – delete line and substitute text (same as cc)
- xp – transpose two letters (delete and paste)
- u – undo
- Ctrl + r – redo
- . – repeat the last command
Marking text (visual mode)
- v – start visual mode, mark lines, then do a command (like y-yank)
- V – start linewise visual mode
- o – move to another end of the marked area
- Ctrl + v – start visual block mode
- O – move to another corner of the block
- aw – mark a word
- ab – a block with ()
- aB – a block with {}
- ib – inner block with ()
- iB – inner block with {}
- Esc – exit visual mode
Visual commands
- > – shift text right
- < – shift text left
- y – yank (copy) marked text
- d – delete marked text
- ~ – switch case
Registers
- :reg – show registers content
- "xy – yank into register x
- "xp – paste contents of register x
Tip Registers are being stored in ~/.viminfo, and will be loaded again on next restart of vim.Tip Register 0 contains always the value of the last yank command.
Marks
- :marks – list of marks
- ma – set current position for mark A
- `a – jump to position of mark A
- y`a – yank text to position of mark A
Macros
- qa – record macro a
- q – stop recording macro
- @a – run macro a
- @@ – rerun last run macro
Cut and paste
- yy – yank (copy) a line
- 2yy – yank (copy) 2 lines
- yw – yank (copy) the characters of the word from the cursor position to the start of the next word
- y$ – yank (copy) to end of line
- p – put (paste) the clipboard after cursor
- P – put (paste) before cursor
- dd – delete (cut) a line
- 2dd – delete (cut) 2 lines
- dw – delete (cut) the characters of the word from the cursor position to the start of the next word
- D – delete (cut) to the end of the line
- d$ – delete (cut) to the end of the line
- x – delete (cut) character
Exiting
- :w – write (save) the file, but don’t exit
- :w !sudo tee % – write out the current file using sudo
- :wq or
 or ZZ – write (save) and quit
 - :q – quit (fails if there are unsaved changes)
- :q! or ZQ – quit and throw away unsaved changes
- :wqa – write (save) and quit on all tabs
Search and replace
- /pattern – search for pattern
- ?pattern – search backward for pattern
- \vpattern – ‘very magic’ pattern: non-alphanumeric characters are interpreted as special regex symbols (no escaping needed)
- n – repeat search in same direction
- N – repeat search in opposite direction
- :%s/old/new/g – replace all old with new throughout file
- :%s/old/new/gc – replace all old with new throughout file with confirmations
- :noh – remove highlighting of search matches
Search in multiple files
- :vimgrep /pattern/ {`{file}`} – search for pattern in multiple files
:vimgrep /foo/ **/*
:cn – jump to the next match
- :cp – jump to the previous match
- :copen – open a window containing the list of matches
Working with multiple files
- :e file – edit a file in a new buffer
- :bnext or :bn – go to the next buffer
- :bprev or :bp – go to the previous buffer
- :bd – delete a buffer (close a file)
- :ls – list all open buffers
- :sp file – open a file in a new buffer and split window
- :vsp file – open a file in a new buffer and vertically split window
- Ctrl + ws – split in different window
- Ctrl + ww – switch vim windows
- Ctrl + wq – quit a window
- Ctrl + wv – split window vertically
- Ctrl + wh – move the cursor to the left window (vertical split)
- Ctrl + wl – move the cursor to the right window (vertical split)
- Ctrl + wj – move the cursor to the window below (horizontal split)
- Ctrl + wk – move the cursor to the window above (horizontal split)
Tabs
- :tabnew or :tabnew {page.words.file} – open a file in a new tab
- Ctrl + wT – move the current split window into its own tab
- gt or :tabnext or :tabn – move to the next tab
- gT or :tabprev or :tabp – move to the previous tab
- #gt – move to tab number #
- :tabmove # – move current tab to the #th position (indexed from 0)
- :tabclose or :tabc – close the current tab and all its windows
- :tabonly or :tabo – close all tabs except for the current one
- :tabdo command – run the
commandon all tabs (e.g:tabdo q– closes all opened tabs)
The post What are Vim and its useful commands cheatsheet appeared first on Creador.